LED
Another great work night
Aug 04, 2016 Filed in: Work Night
Wow! What a fun and productive work night we had tonight!
Joe came over to install some sweet Kasper MKVII, rev 2 turnouts at East Rhineland, and Steve, with his out-of-town friend, Matt, helped with scenery and LED lighting.
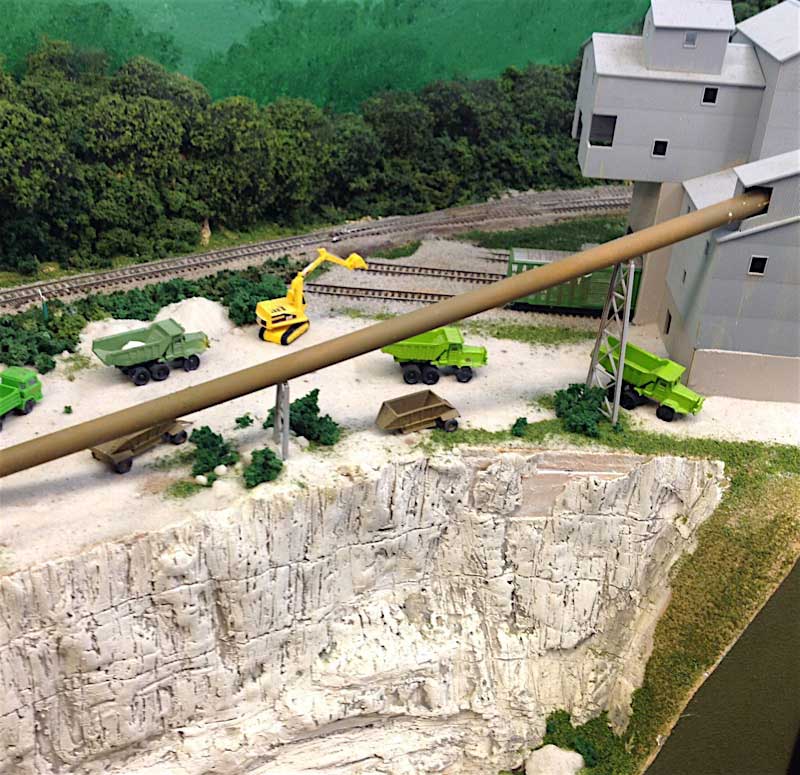
Pat Lana had previously presented me with a pill bottle full of silica sand from the actual Tavern Rock Quarry area, and Steve used the material to make the layout's Tavern Rock industry look like a dusty, sandy place that it probably was when it was active. The silica sand is very fine - I'm sure that every building, piece of machinery, and rail car was covered with it!
Joe spent the night installing two turnouts at the east end of Rhineland. With the addition of these turnouts, all of Rhineland will benefit from the coveted Kasper MKVI, Rev 2's! Then it's on to Mokane!
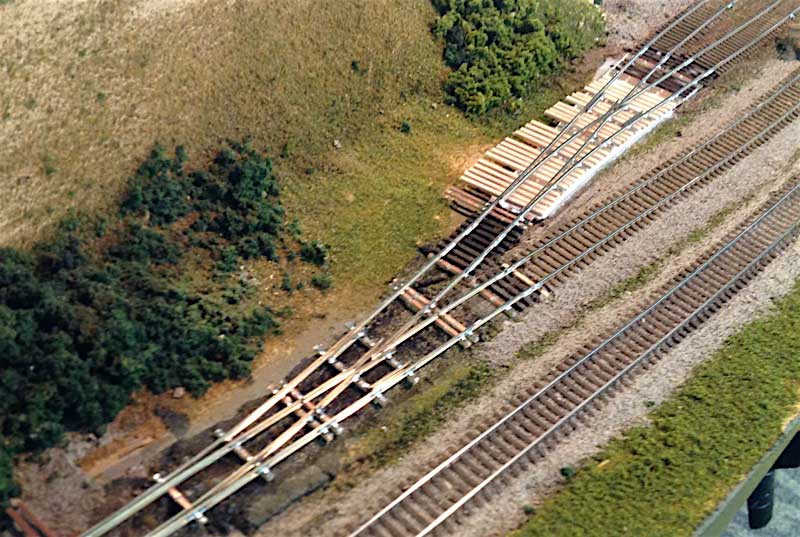
The result of Joe's work tonight at east Rhineland. We still need to add ties, cut the ties to length, add tortoises and wire the track and frog. The locals will really enjoy the silky smooth operation of the Kasper MKVII, Rev 2 turnouts!
While Joe and Steve were busy with their projects, Matt helped me with a project that has been on my list for a while: adding LED lights to the backdrops at St. Charles. We installed a few tonight, but I didn't really have the correct size wire, so we abandoned that project until I get the proper materials.
I switched over to installing LEDs at Yuasa Battery, a small industry in west Rhineland. Using my copper foil bus technique, I quickly installed five LEDs around the building. I really like using the copper foil - it makes wiring so much easier.
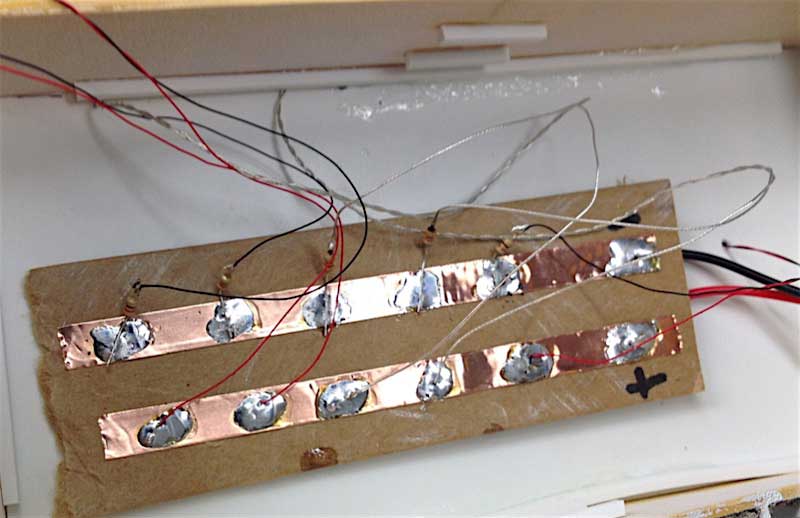
Closeup of the copper foil bus, showing the resistors needed for the LEDs.
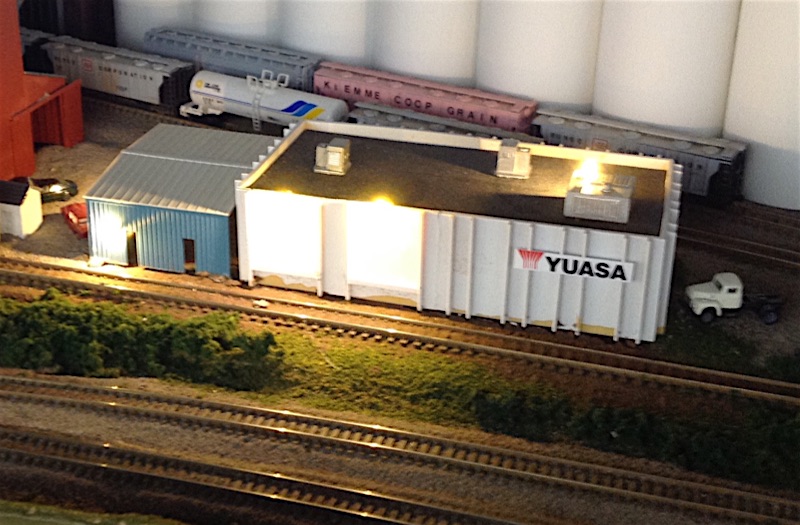
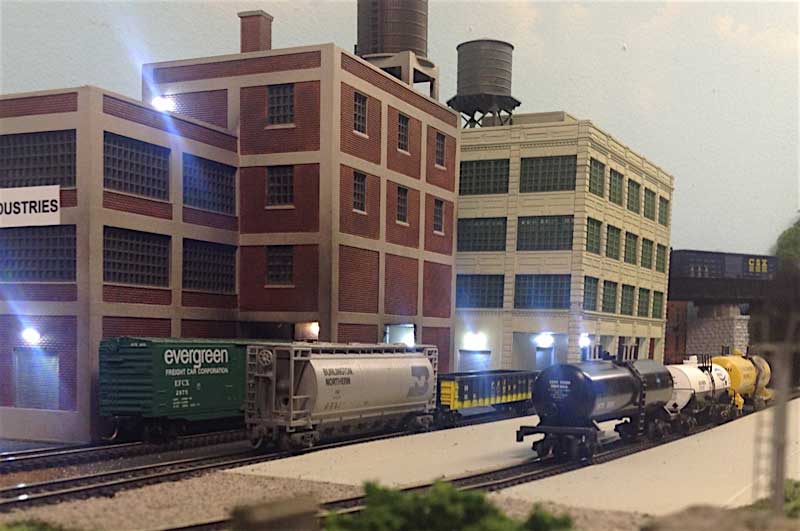
The Yuasa lights are really bright! I may need to increase the value of the in-line resistors to dim them down a bit (especially the roof-mounted security light). Note that the buildings are not in their final locations. I need to adjust the resistor values, then I will plant the buildings.
By now, I know the question that you are dying to ask, "Did you serve Fiddle Faddle, the official snack of the Mighty MKT work nights?" The answer: OF COURSE! It wouldn't be a work session without Fiddle Faddle. We even had Mountain Dew (or, as my daughter says it, Mountain Dude) for Stevie.
Thanks for all your help, guys!
Joe came over to install some sweet Kasper MKVII, rev 2 turnouts at East Rhineland, and Steve, with his out-of-town friend, Matt, helped with scenery and LED lighting.
Pat Lana had previously presented me with a pill bottle full of silica sand from the actual Tavern Rock Quarry area, and Steve used the material to make the layout's Tavern Rock industry look like a dusty, sandy place that it probably was when it was active. The silica sand is very fine - I'm sure that every building, piece of machinery, and rail car was covered with it!
Joe spent the night installing two turnouts at the east end of Rhineland. With the addition of these turnouts, all of Rhineland will benefit from the coveted Kasper MKVI, Rev 2's! Then it's on to Mokane!
The result of Joe's work tonight at east Rhineland. We still need to add ties, cut the ties to length, add tortoises and wire the track and frog. The locals will really enjoy the silky smooth operation of the Kasper MKVII, Rev 2 turnouts!
While Joe and Steve were busy with their projects, Matt helped me with a project that has been on my list for a while: adding LED lights to the backdrops at St. Charles. We installed a few tonight, but I didn't really have the correct size wire, so we abandoned that project until I get the proper materials.
I switched over to installing LEDs at Yuasa Battery, a small industry in west Rhineland. Using my copper foil bus technique, I quickly installed five LEDs around the building. I really like using the copper foil - it makes wiring so much easier.
Closeup of the copper foil bus, showing the resistors needed for the LEDs.
The Yuasa lights are really bright! I may need to increase the value of the in-line resistors to dim them down a bit (especially the roof-mounted security light). Note that the buildings are not in their final locations. I need to adjust the resistor values, then I will plant the buildings.
By now, I know the question that you are dying to ask, "Did you serve Fiddle Faddle, the official snack of the Mighty MKT work nights?" The answer: OF COURSE! It wouldn't be a work session without Fiddle Faddle. We even had Mountain Dew (or, as my daughter says it, Mountain Dude) for Stevie.
Thanks for all your help, guys!
Let there be (LED) light!
The last few days have been busy with some final projects before I start cleaning the layout in preparation for the N-scale Convention tours and operating sessions.
I wanted to add some lighting the ACF Car Repair buildings at East St. Charles.
The lights turned out great and I wanted to share my method for installing the LEDs. It's not rocket science, but you may find a tip or two here.
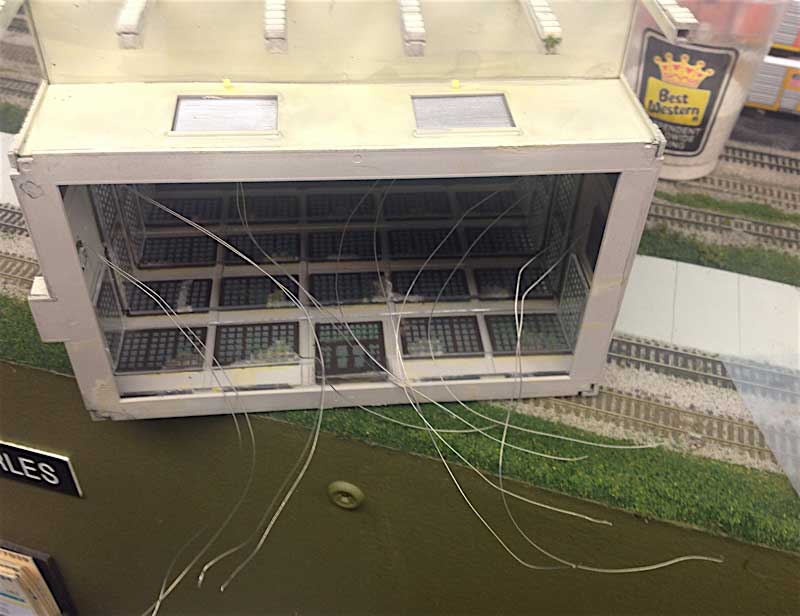
Step 1 - buy the pre-wired LEDs off eBay (free shipping from China!) and install in the buildings. I just drill a small hole at the location, thread the wires in and secure in place with a tiny dab of super glue. A quick shot of CA accelerator, and the LED is secure.
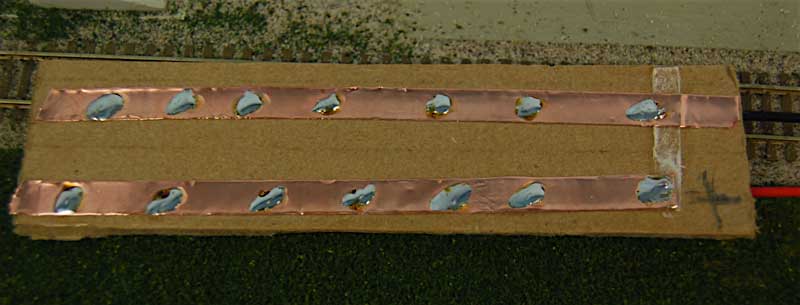
Step 2 - I make an electrical bus with copper strips that are used for stained glass windows. It has an adhesive backing and takes solder REALLY well. I also use wiring connector plugs (from eBay) that allow me to building these things at the work bench, then plug them into a 12 volt supply from under the layout. Both the positive bus and the ground bus are tinned where I will land the resistors and the wires.
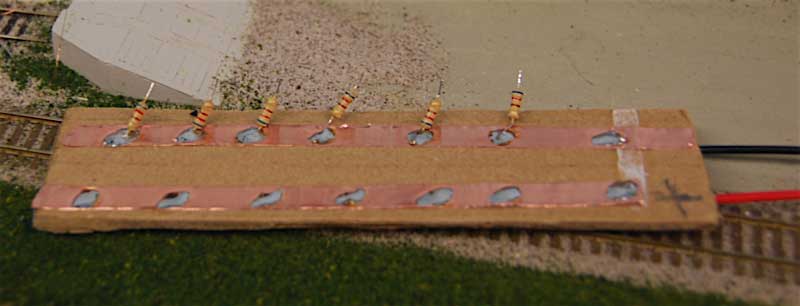
Step 3 - I trim the leads from the resistors and solder into place. The resistor leads going to the bus don't need to be tinned, but I tin the free ends, because it makes the next step a LOT easier. The resistors values have been selected to provide good intensity with a 12 volt supply.

Step 4 - I then tin the wires from the LEDs, being mindful of which wire is the positive (these are light emitting diodes, right, so polarity is important). I land the wires. At the positive bus, the wires attach very easily and quickly. For the resistor side, I use the "Kasper paralllel soldering method", where the two wires are tinned, held parallel, heated simultaneously, then held precisely in place while the solder cools. This technique requires a steady hand, and tinning the wires beforehand is crucial. I'm getting better at it.
Elite Operator™ tip! It doesn't matter if the resistors go before the LEDs or after the LEDs in the circuit. Just sayin'.
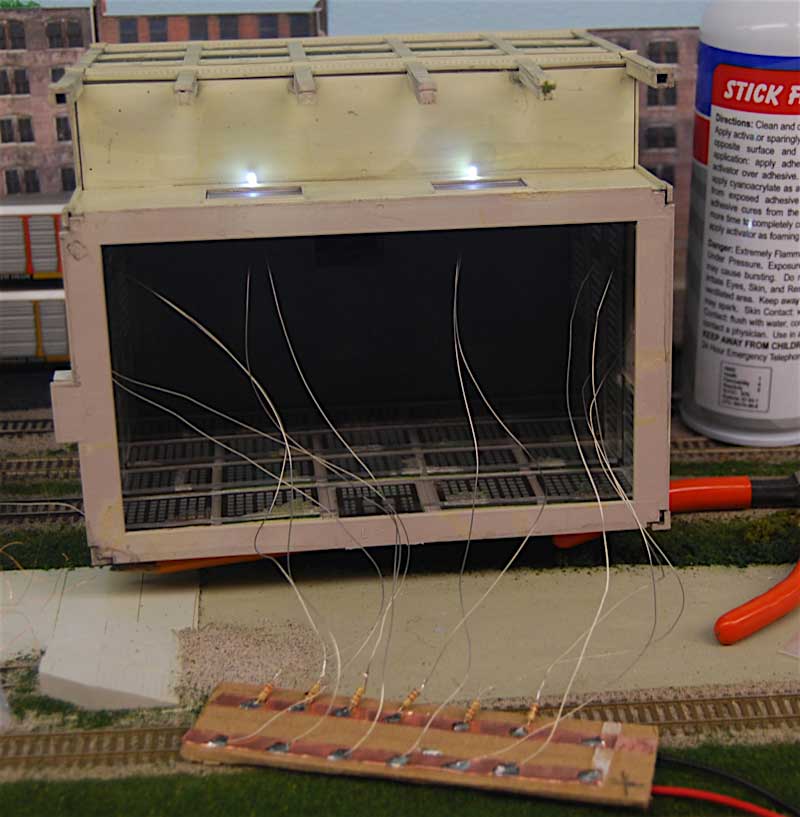
Step 5 - Test the wiring (I have a battery pack with a connecting plug to help with this step.
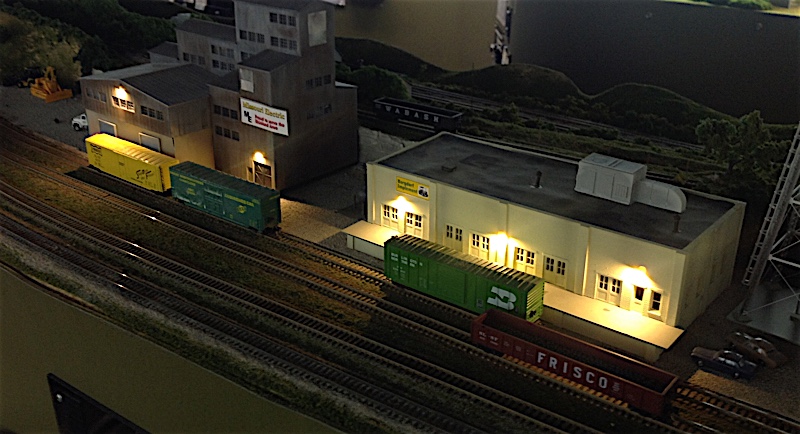
VOILA! Yummy lighting goodness! I think lighting really adds to the scene. These LEDs are cool white - they also sell a "warm white" version that I like a bit better. I may warm these LEDs up a bit with a dab of Tamiya clear tinted paint.
I wanted to add some lighting the ACF Car Repair buildings at East St. Charles.
The lights turned out great and I wanted to share my method for installing the LEDs. It's not rocket science, but you may find a tip or two here.
Step 1 - buy the pre-wired LEDs off eBay (free shipping from China!) and install in the buildings. I just drill a small hole at the location, thread the wires in and secure in place with a tiny dab of super glue. A quick shot of CA accelerator, and the LED is secure.
Step 2 - I make an electrical bus with copper strips that are used for stained glass windows. It has an adhesive backing and takes solder REALLY well. I also use wiring connector plugs (from eBay) that allow me to building these things at the work bench, then plug them into a 12 volt supply from under the layout. Both the positive bus and the ground bus are tinned where I will land the resistors and the wires.
Step 3 - I trim the leads from the resistors and solder into place. The resistor leads going to the bus don't need to be tinned, but I tin the free ends, because it makes the next step a LOT easier. The resistors values have been selected to provide good intensity with a 12 volt supply.
Step 4 - I then tin the wires from the LEDs, being mindful of which wire is the positive (these are light emitting diodes, right, so polarity is important). I land the wires. At the positive bus, the wires attach very easily and quickly. For the resistor side, I use the "Kasper paralllel soldering method", where the two wires are tinned, held parallel, heated simultaneously, then held precisely in place while the solder cools. This technique requires a steady hand, and tinning the wires beforehand is crucial. I'm getting better at it.
Elite Operator™ tip! It doesn't matter if the resistors go before the LEDs or after the LEDs in the circuit. Just sayin'.
Step 5 - Test the wiring (I have a battery pack with a connecting plug to help with this step.
VOILA! Yummy lighting goodness! I think lighting really adds to the scene. These LEDs are cool white - they also sell a "warm white" version that I like a bit better. I may warm these LEDs up a bit with a dab of Tamiya clear tinted paint.
The pull-up resistor
Jun 14, 2016 Filed in: electronics
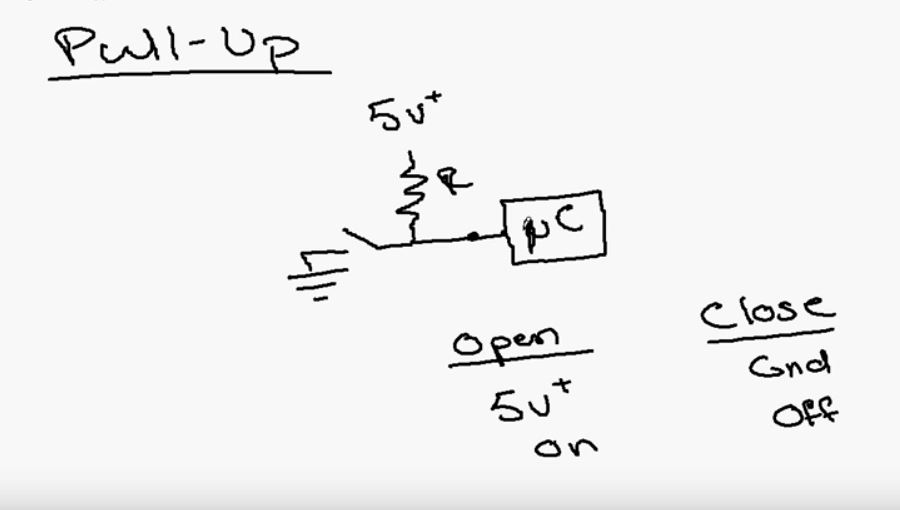
I've been working on some arduino circuits and decided to take a break to learn a bit about pull-up resistors, which are used in a digital circuits to prevent floating conditions when dealing with inputs.
As usual, a quick search on the google provided a ton of information on the subject. Here is a great video that I found on the youtubes:
New lights for East Rhineland
Apr 02, 2016 Filed in: Scenery
The upgrades continue, this time with some security lighting for the East Rhineland industries.
These are super bright, pre-wired, and tiny LEDs that are available on eBay.