Operations
It's the little things
Apr 12, 2017
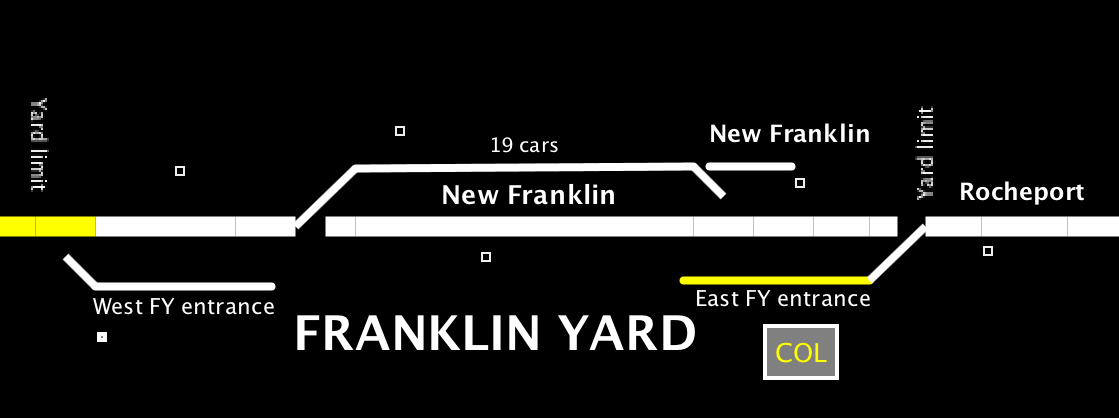
East Franklin Yard Entrance is now detected - the track displays yellow when occupied
I've been working on the JMRI panels lately, adding more functionality and user-friendly features.
One feature that I've wanted for a while, ever since I added train logging on the main screen, is to put block detection on the entrance tracks at Franklin Yard. With the entrance tracks detected, the dispatcher can then enter a train identifier so that the train will be tracked across the main screen
Tonight, I wired the east entrance, and set up the CMRI sensors and JMRI logic code to make it work. I will cocninue with the west entrance track tomorrow (hopefully). This should enhance the dispatcher user experience!
The old and the new
Sep 25, 2016
I've been working on the dispatcher's screen lately, improving both the DOS-based QuickBASIC version and the MacOS-based JMRI version.
Here is the QuickBASIC version that I have had for several years:
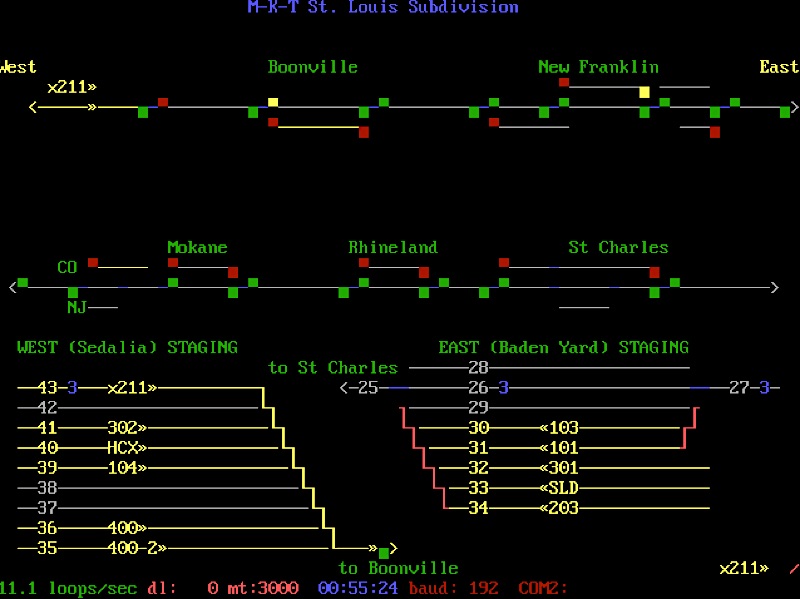
The first thing that you'll note is that there is more information on the DOS screen at this time. It includes signals, direction of travel, and logs the train symbols as the trains move across the screen. The graphics are a bit clunky compared to the slick JMRI screen, but for a program that uses only ASCII symbols, I thought the graphics were pretty nice for its time.
Here is the JMRI version:
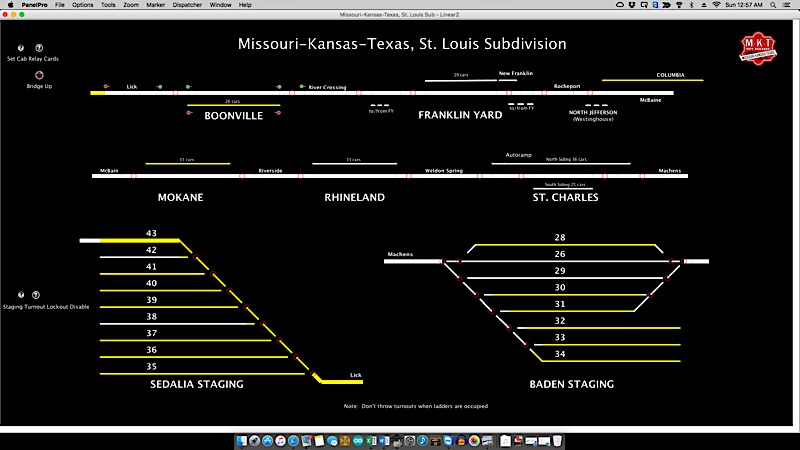
I have only started to add the signals onto the JMRI panel, and I haven't implemented train logging yet.
I'm torn about continuing to use the QuickBASIC program and am wondering if I should just make a whole-hearted jump to the JMRI panel. Both work fine, but I have been having intermittent glitches with the Mac mini that I have been using to drive the QuickBASIC version (see previous post).
I will post further updates on the blog about the panel drama as I continue to refine both programs.
Here is the QuickBASIC version that I have had for several years:

The first thing that you'll note is that there is more information on the DOS screen at this time. It includes signals, direction of travel, and logs the train symbols as the trains move across the screen. The graphics are a bit clunky compared to the slick JMRI screen, but for a program that uses only ASCII symbols, I thought the graphics were pretty nice for its time.
Here is the JMRI version:

I have only started to add the signals onto the JMRI panel, and I haven't implemented train logging yet.
I'm torn about continuing to use the QuickBASIC program and am wondering if I should just make a whole-hearted jump to the JMRI panel. Both work fine, but I have been having intermittent glitches with the Mac mini that I have been using to drive the QuickBASIC version (see previous post).
I will post further updates on the blog about the panel drama as I continue to refine both programs.
Switchlist for the Mighty MKT
Sep 14, 2016
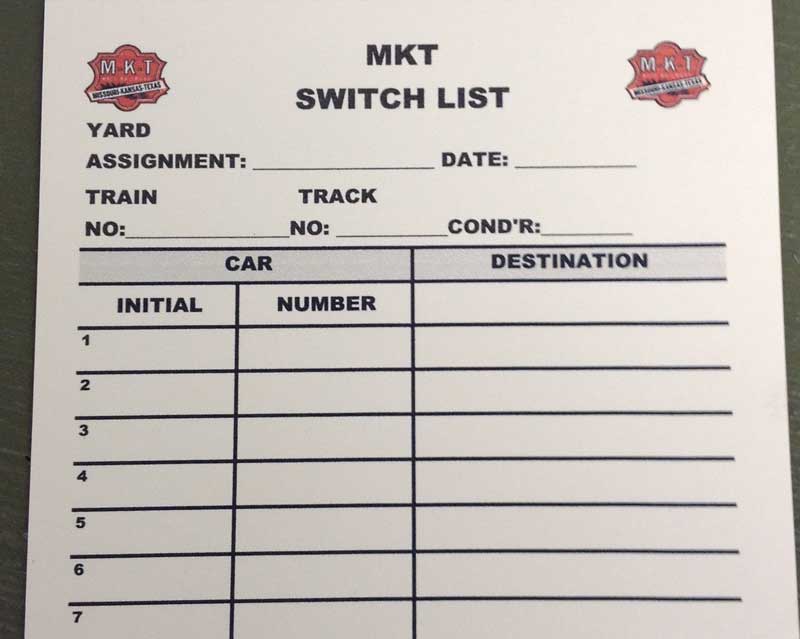
Many of my railroady friends like to use switchlists during operating sessions. I use them off-and-on, but generally prefer just to string the car cars out along the layout when I'm working a train (definitely NOT an Elite Operator™ habit!!).
For a long time, I copied a prototype switchlist that I found at a train meet, but I recent decided to make some Mighty MKT-specific switch list. I made a template in Microsoft Excel (using the prototype list as a guide) and printed the lists out on buff-colored card stock.
They look good, and add a nice custom touch to the layout.
Determining Car Demand
Sep 07, 2016
Method to Estimate Car Demand
I love to buy new cars for the layout. As a matter of fact, I have boxes and boxes of cars that are not on the layout, because I:
After a fun week of hosting multiple operating sessions for attendees to the National N-Scale Convention (which was held in Kansas City in late-June 2016), I had the opportunity to assess the traffic flow on the Mighty MKT. The following discussion presents my criteria and parameters for determining the quantity of cars that are waybilled on the layout.
My rule of thumb is to have each industrial spots in each town half full of car. Of those cars spotted in town, I try to have half of them be pulls and the other half will remain in the town. So approximately 25 percent of the track capacity will be turned over during an operating session. A small town like Mokane on the Mighty MKT has four separate industries with a total of 12 spots, with cars at six of those industry spots. I would set up the waybills to pull 3 of those cars during the session, and have the locals bring in three new cars.
So, there are three factors that enter into the car demand on a layout:
The next step is to estimate the number of cars that would be at an industry at any given time. Using my 50 percent rule of thumb, approximately 96 cars would be located at industries on the layout (note that this excludes the autoracks in St. Charles, the pigs at the TOFC ramps in New Franklin and St. Charles, and the UP industries in Boonville.
Of these 96 cars, 50 percent will be picked up by the locals during the operating session and replaced by new cars brought in by the locals. These 48 (0.5 * 96) cars will be hauled back to Franklin Yard and will go out on the 100-series freight trains (east or west, depending on the direction shown on the waybill for a given car. The layout has seven primary destinations (Boonville, New Franklin, North Jefferson (Westinghouse), Columbia, Mokane, Rhineland, and St. Charles), so each destination will, on average, receive seven cars during a typical operating session. Functionally, the larger destinations will receive proportionally more cars.
The Mighty MKT runs up to five locals during a session:
Total Cars on the Layout
If you have stuck with this analysis up to this point, I can anticipate your next question: “Geez, only 48 cars moving on the layout? Why bother?!” It turns out to be a bit more complicated than that. On the Mighty MKT, at any given time, cars can exist in only six states (not including autoracks the TOFC):
So the 48 cars on the five locals make for an average 10-car train length. And the 48 cars in the five staged trains (101, 102, 103, 104, and Extra 211, a yard to yard transfer) result in an average 10-car cut to be delivered to Franklin Yard per train.
I love to buy new cars for the layout. As a matter of fact, I have boxes and boxes of cars that are not on the layout, because I:
- Originally over-purchased cars, and
- I have, over the years, removed a TON of cars from the layout because it gets too plugged and unbalanced after several operating sessions.
After a fun week of hosting multiple operating sessions for attendees to the National N-Scale Convention (which was held in Kansas City in late-June 2016), I had the opportunity to assess the traffic flow on the Mighty MKT. The following discussion presents my criteria and parameters for determining the quantity of cars that are waybilled on the layout.
My rule of thumb is to have each industrial spots in each town half full of car. Of those cars spotted in town, I try to have half of them be pulls and the other half will remain in the town. So approximately 25 percent of the track capacity will be turned over during an operating session. A small town like Mokane on the Mighty MKT has four separate industries with a total of 12 spots, with cars at six of those industry spots. I would set up the waybills to pull 3 of those cars during the session, and have the locals bring in three new cars.
So, there are three factors that enter into the car demand on a layout:
- The number of effective industry spots on the layout
- The percentage of industry spots that would have cars actually located at them (I use 50 percent)
- The percentage of cars that will be picked up from an industry during a given session (I use 50 percent)
The next step is to estimate the number of cars that would be at an industry at any given time. Using my 50 percent rule of thumb, approximately 96 cars would be located at industries on the layout (note that this excludes the autoracks in St. Charles, the pigs at the TOFC ramps in New Franklin and St. Charles, and the UP industries in Boonville.
Of these 96 cars, 50 percent will be picked up by the locals during the operating session and replaced by new cars brought in by the locals. These 48 (0.5 * 96) cars will be hauled back to Franklin Yard and will go out on the 100-series freight trains (east or west, depending on the direction shown on the waybill for a given car. The layout has seven primary destinations (Boonville, New Franklin, North Jefferson (Westinghouse), Columbia, Mokane, Rhineland, and St. Charles), so each destination will, on average, receive seven cars during a typical operating session. Functionally, the larger destinations will receive proportionally more cars.
The Mighty MKT runs up to five locals during a session:
- Boonville
- New Franklin
- Columbia
- St. Charles
- Mokane/Rhineland
Total Cars on the Layout
If you have stuck with this analysis up to this point, I can anticipate your next question: “Geez, only 48 cars moving on the layout? Why bother?!” It turns out to be a bit more complicated than that. On the Mighty MKT, at any given time, cars can exist in only six states (not including autoracks the TOFC):
- At an industry
- On a local to be delivered to an industry
- In the yard, destined to be placed in a future local for delivery
- In the yard, intended for an east or west off-layout destination
- On a train, intended for delivery at Franklin Yard, thence to an on-layout industry
- On a train, intended for an off-layout destination
- At an industry
- On a train destined for Franklin Yard
- Currently on a local OR already in the yard – these items are combined because any car destined for an online industry would be quickly placed onto a local unless the length limit had been met for that given local, or the train had very recently been sent out when the car arrived in the yard.
- 48 cars currently at industries that will NOT get moved during the session (this is the other half of the cars spotted at industries)
- 48 cars currently at industries that WILL get picked up during the session
- 48 cars destined for industries that are either currently on a local or in the yard. These cars will get spotted at the industries to replace the cars picked up.
- 48 cars on staged trains that will be delivered to the yard during the session. These cars feed the yard and provide the traffic that will make up the next round of locals.
So the 48 cars on the five locals make for an average 10-car train length. And the 48 cars in the five staged trains (101, 102, 103, 104, and Extra 211, a yard to yard transfer) result in an average 10-car cut to be delivered to Franklin Yard per train.
New Staging Camera and Monitor
Mar 28, 2016
Long dreamed about, but only recently implemented, the new Staging Monitor is intended to enhance the operating experience on the mighty MKT.
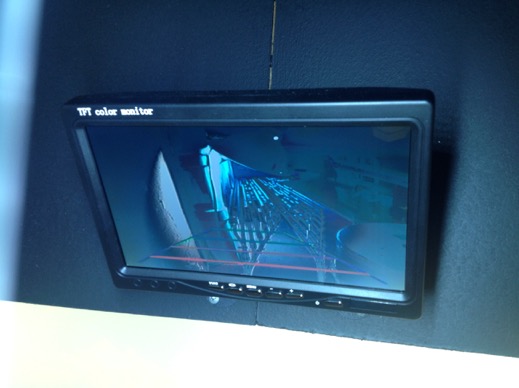
My staging yard in located in a separate room, and operators currently start their run in the staging yard, pole their head locomotive through the hole into the layout room. They then need to walk around the crew lounge, through the lift bridge (Lift! don't duck) and into the train room to continue their run. My vision/goal/dream is to use a camera that would allow the operator to begin and end their runs in the train room, resulting in an improved operating experience.
I recently found 12 V backup camera and monitor online on eBay for about $40. It looked like it would work, and the 12Volt power is a bonus, because I can wire it into my 12 Volt accessory bus that runs around the layout room.
Installation was pretty easy. I placed the monitor on the facia near the location the trains punch the wall into staging
The camera was a bit more problematic. I wanted to get the right field of vision that would be useful for the operators. I built a small frame to place the camera at the right height, taking care to avoid the glare of the staging lights.
I really happy with installation! The only downside is that the camera has "backing lines" on the display that, while perhaps useful for backing a car, are not particularly useful for stating a train. I may do some more online research and replace the camera with another model that does not have those backing lines.
New Wireless Throttles!
Jan 26, 2016

CVP Products recently came out with their new wireless throttles for EasyDCC, the T1300 "OPS".
I had seen a prototype of this throttle last summer at the National Train Show in Portland, and I was anxiously waiting for CVP to make them available. I ordered three of them the day they came out.
I love them. They approach my ideal throttle design…now if they could offer a center-off toggle for direction, I would be perfectly happy!
Here are some of the things I really like:
- Rechargeable battery pack with micro USB charging port (no more changing batteries!)
- The lithium ion battery provides 60+ hours of continuous operation between charges. So, if I operate once a month, and each op session is 3 hours long, then I'll need to recharge them every…1.7 years!? Nice!
- No antenna. Nice!
- Slim case design. Fits my hand better. Nice!
- Contoured case with no sharpish metal/plastic interface. Nice!
- Single turn, robust speed control knob…no more roundy roundy round.
You select the Throttle ID number by cutting traces, which initially sent a ripple of boos through the Yahoo EasyDCC users group. But I like the idea of "Cut once and forget it". No operator accidentally resetting the throttle number with the command keys. So I say bravo for that!
You still set the throttle frequency with internal DIP switches. You set the transmit mode (scan or burst mode) by cutting more traces.
There are a couple other features that are notable: You can't assign a throttle unless the speed knob is turned to off. And you loose assignment if the throttle is turned off. Both of these are fine features.
All in all, I'm loving the new throttles. The only question is: When can I order more?!
Read More…